Showing posts with label Measurement. Show all posts

Tuesday, April 9, 2013

Capacity: Interactive Math Notebooks

Capacity is always fun!  Unfortunately, when moving to our new building, all the containers I had saved for this day were tossed thinking it was trash!  Can you believe it? Someone thought our old milk cartons and jugs were trash!  Anyway, I'm lucky to have a mom who also teaches 5th grade math (you should hear our phone conversations....very animated!) and because she had taught capacity the week before, she was willing to lend me her collection.  Saved by mom (again!).  After a lot of spilled water and "do you predict this container will hold two or three of these?" we moved into our notebooks to record our thoughts.

First, we wrote down the Big G.  Why didn't we have this when I was a kid??  I never remembered what the Gallon Bot was and it was way too difficult to recreate, but the Big G is EASY!  It's truly how I remember my conversions.  Here is a picture:


Next, I gave them a moment to free write.  I really wanted them to write down everything they knew about capacity, so each student's page is very different, but many chose to write down conversions based on the Big G.  I walked around making sure that they understood how to read it.  Here is one example:


Of course, there's also an anchor chart hanging in our room of the Big G that we refer to often, but I didn't feel the need to post it here because it is the same as the notebook page :)

Measurement and conversions: Interactive Math Notebooks

Again, I'm behind on posting this! Where does the time go?  We did measurement back in March, and while we did a lot with it, I'm just going to outline what we did with our notebooks in this post.  We began by discussing the two systems of measurement.  We decided the best way to organize this information was in a T chart (we REALLY like those around here!) and we wanted to keep all the types of measurement (length, capacity, weight) together as well.  Here is the list we came up with:


Next, we brainstormed some of the basic conversions we remembered for length for each system and wrote them down.  Lastly, we took notes on an easy way to convert between units of measurement.   A BIG "thank you" to my coworker Adrienne, the 4th grade math teacher, for sharing her mnemonic device!  Some of my students remembered it from last year!  She taught us that there are two ways to change units: to multiply or divide.  When converting from a Big unit to a Small unit, you Multiply, so we think "Best Soccer Mom."  When converting from a Small unit to a Big unit, you Divide, so we think "Silly Babies Dancing."  We always giggle at "Silly Babies Dancing!"


Below is the anchor chart hanging in our room to serve as a reminder.  Another "thank you" to Adrienne!  I got this straight from her!  Thank goodness for kind coworkers willing to share and kick around ideas with!


Wednesday, April 3, 2013

Pi Day!

March 14. Finally. An ENTIRE DAY dedicated to MATH!  And it's PERFECT for 5th grade!  I started getting the kids excited about Pi day early in March.  Some knew that pi = 3.14, but they really didn't know much more than that.  I could feel the excitement as they entered the room that Thursday morning.  I only had 90 minutes with each class and each minute was accounted and planned for, so we got right to business. Here is an outline of our activities for the day!


1. Quiet morning activity: Write as many digits in pi as you can around a paper plate

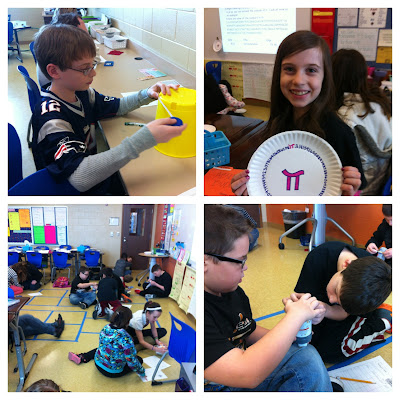
I used a paper plate for two reasons: I have 75 kids and they are CHEAP! And, of course, it's a circle.  The directions were on the projector when the kids walked in and they quickly figured out they needed to sit as close to the board as possible so as not to miss a single digit.  I only gave them about ten minutes to make their paper plate.  I wanted them to have something to take home to show their parents as well as something to study from for our Pi contest.  More on that later!  This activity also got them wondering what the heck pi was!  Here are some paper plate making shots:

Allison ended up getting 4th place in our pi contest!


Busy at work making their paper plates!


2. History of Pi

We found a short history of pi in our books, and discussed it briefly.  Many kids were fascinated by the fact that the definition of pi has changed so much throughout history (their teacher was fascinated too!).  I could feel the excitement building now!

3. Measurement of circles and discovery of pi

We briefly discussed using centimeters in our measurement and getting right down to the exact millimeter so that our measurements were as accurate as possible.  This was just a review for them.  We also discussed measuring diameter as going right down the center of the circle as well as reviewed what ratio meant since we were finding the ratio of circumference to diameter.  We did one example together, and off they went about the room.  I had a table full of circular objects for them to choose from, and a chart from superteacherworksheets.com to fill in as they went.  While they worked, I walked around and discussed findings, as well as helped troubleshoot when I could tell their measurements were off.  
All the lovely objects we have to measure!  Yes, that is my soap from my bathroom, and my coffee mug :) 

"Ms. McHugh, did you even wash out your mug?"  


Pretty accurate I would say!  

Partners hard at work measuring and loving every moment of it!

What a great day!

4. Discovery

Once we were finished, we had a lengthy discussion about what we learned.  Ultimately, I wanted them to see that the circumference of a circle was about three time its diameter.  We used our knowledge of finding the unknown (all our algebra work is paying off!) to figure out that if you don't know the circumference, but you do know the diameter, you can use pi to help you find it.  There were a couple ah ha moments at this point.  I literally saw the understanding unfold on Ivy's face!  It was neat to see her go through the process of understanding using our measuring activity and finding 3.14 was (about) the ratio each time, to knowing that she could always use that to find circumference.  These are the moments people!  The ah ha moments! :)

5. Short video

We always try to wrap up with a short video from StudyJams, and today was no different.  It gives them a chance to listen to someone else talk about what we learned and they do a great job of putting concepts into real world situations.  If you haven't checked out StudyJams yet, I encourage you to do so!

6. Cookies

On a day like today, you have to have a fun treat!  Every student received a cookie, but don't worry, we found its diameter and circumference first!  YUM!


7. Contest time!
Lastly, I held a digit reciting contest.  I gave them until the next day to see how many digits they could memorize in pi.  It was completely optional and just for fun.  I was so impressed by how many students really got into it, and memorized WAY more digits than I ever could!  Our winner was Cale: he memorized 78 digits!  WOW!


All in all, this will stand to be one of my favorite days of the year.  I think my students would have to agree!


Tuesday, March 12, 2013

Measurement: Perimeter and Area

Teaching perimeter and area is one of my favorites because it can be so hands on (oh but just you wait until volume, surface area, and circumference!) Because our 4th grade teachers did such an excellent job in this area (pun completely intended!) I didn't feel the need to dwell on perimeter and area of rectangles for long.  Thanks to Pinterest, I found an easy, hands-on way to review area and perimeter of rectangles that wasn't just a worksheet to complete.  After watching a couple StudyJams videos, we went straight to work with some grid paper, two dice, and our pencils.  Students were to roll the dice and create an array to display the numbers on the dice.  Then, they were to find the area and perimeter of the array.  We discussed either counting the squares, or using the formula they used in 4th grade for area.  I worked with a couple struggling students.  I had them highlight the outside of the array in one color to find perimeter, then color the inside of the array with another color to find the area.  This really seemed to jog their memory!  Below is a picture of Aaliyah's arrays (although, I'll have to remind her that area is measured in square units....or squAREA!)


The next day, we moved on to finding the area of parallelograms and triangles.  This proved to be much more difficult, they concluded.  The triangles and parallelograms were drawn on centimeter grid paper, and at first, some students were trying to shade whole squares, then put together pieces to create more wholes.  When we shared answers and found that we all had something slightly different, we need we needed a better solution.  I asked them why finding the area of a rectangle was so easy for them, but these polygons were so much more difficult.  The conversation went something like this:

Student 1: Because with rectangles you just count the squares and that's the area!
Me: Ok.....so why are triangles and parallelograms so much harder?
Student 2: There are sometimes all these little pieces of squares that you have to put together.  Sometimes they are easy, like if it's just a half of a square.  But other times they are harder.
Me: What is it about rectangles that make it have just whole squares or half squares then? <silence in the room>
Student 3: It....has....right angles?
Me: And....?
Student 3: Right angles are squared off....so they are easier to count!
Me: So what if we made our parallelograms into rectangles so that they are easier to count?

We went on to change each polygon into rectangles and go from there.  I let them struggle with this method for homework: not all of the polygons were easy to change accurately.  On day 3, we went at it again.  Many students came in frustrated and unsure if their answers were correct.  And this is how we led into the discovery of the formula for finding the area of triangles and parallelograms!

We began class by looking at a scalene triangle and trying to find its area.  I had them do what they did before.....divide it into 2 rectangles and find the area of each, then add them together.  This time, however, they had to add up a bunch of half squares and quarter squares.  It took them forever and they were frustrated (yet again).  After all that, they knew they still had to divide it in half because it was only a triangle.  That's when they saw that they were really just finding the area of a rectangle and dividing it in half!  We tried this method, which was much simpler to multiply the length by the width, then divide in half, rather then count up all these pieces of squares.  I actually had one student's face light up as she yelled out "OhMyGosh! That is SO much easier!  Can we ALWAYS do it like that?!" To which I happily replied, "Yes, Ivy, because you just figured out the formula for finding the area of a triangle!"  They were so relieved, and shocked, that it was THAT easy.  We did a similar discovery lesson with parallelograms, cutting them in half and making them rectangles.

The last 15 minutes of class were spent updating our notebooks and reflecting.  We used the right side so show sample problems and made sure to highlight the base and height of each polygon in separate colors to help out our brains.  Then, on the left side, I allowed them to write whatever they wanted on area of parallelograms and triangles.  They were told they could use words, pictures, examples, formulas, or a combination to reflect on what they had learned.  I think they did a great job! They even asked for more time! Here are some examples on the work we've done in our notebooks for area and perimeter:

Each student received two random arrays.  They were asked to find the perimeter of one, use it to define perimeter, and think of examples.  Then, we did the same with area of the other.  Great visual! 


Here is the right side of Allison's notebook.  They used one color highlighter for base, and one for height to help them see that they come together to form a right angle.

Here are a couple of the left side thinking from my students.  Again, they were able to write their own notes on area.  Each are a little different, but reflect how each student prefers to receive their information.


And lastly, as usual, we always make an anchor chart after we have learned something.  Perhaps, if they glance at it enough, the information will stick!!

Area of Triangles and Parallelograms Anchor Chart